Create an instance on Amazon AWS
Setting up a cloud server using Amazon AWS cloud computing services is very simple and fast, in just a few minutes you can have your Linux or Windows Server up and running. This article covers the main instructions for creating an instance (server) with a Linux Ubuntu 14.10 distribution using the Amazon AWS EC2 (Elastic Cloud Computing) service.
Index
- Introduction
- Requirements
- Select region
- Configure security group
- Create an EC2 Instance
- Create Elastic IP and associate it with an instance
- Connect to Instance via SSH
- Conclusion
Introduction
In the approach of this article it is very important to understand some basic terms that will be used during each step, because Amazon AWS uses different nomenclatures for its services, therefore, terms such as, Instance means Server , Elastic IP means Fixed IP, Security Group means Firewall and Console means Panel.
Requirements
To proceed with this article, it is necessary to:
- Having an Amazon AWS account, I assume you have already created it, and that you are already logged in with your credentials on AWS console.
- Understand how to connect to a remote server via SSH.
- Have Putty installed (Windows users only).
Select region
After entering the AWS console is necessary to define a standard region where your data and servers will be stored, Amazon AWS has DataCenter around the world if you want to target services to users nationwide, then choose the region Mumbai.
Each region where Amazon has a DataCenter is identified by a unique ID, In Mumbai is ap-south-1, for example. in California it is us-west-1. Prices also vary from region to region at the moment Mumbai. A Oregon region us-west-2 n the United States has the lowest cost for AWS services, however it is necessary to take into account the latency due to the distance between one region and another.
Well, to select a region where your server and services will be allocated, access the menu in the upper right corner of the console.
After selecting a region, click on the EC2 service.
Configure Security Group
Before creating an instance, it is important to define a Security Group with access permissions according to its objective, in which case a new Security Group will be defined to meet the requirements of a web server, therefore it will be necessary to release TCP ports 80 for access via HTTP protocol and 22 to be able to connect to the server remotely via SSH.
In the left side menu of the ec2 console locate the item NETWORK & SECURITY click on Security Groups, then on the Create Security Group, button , a dialog window as in image 4.1 should be displayed..
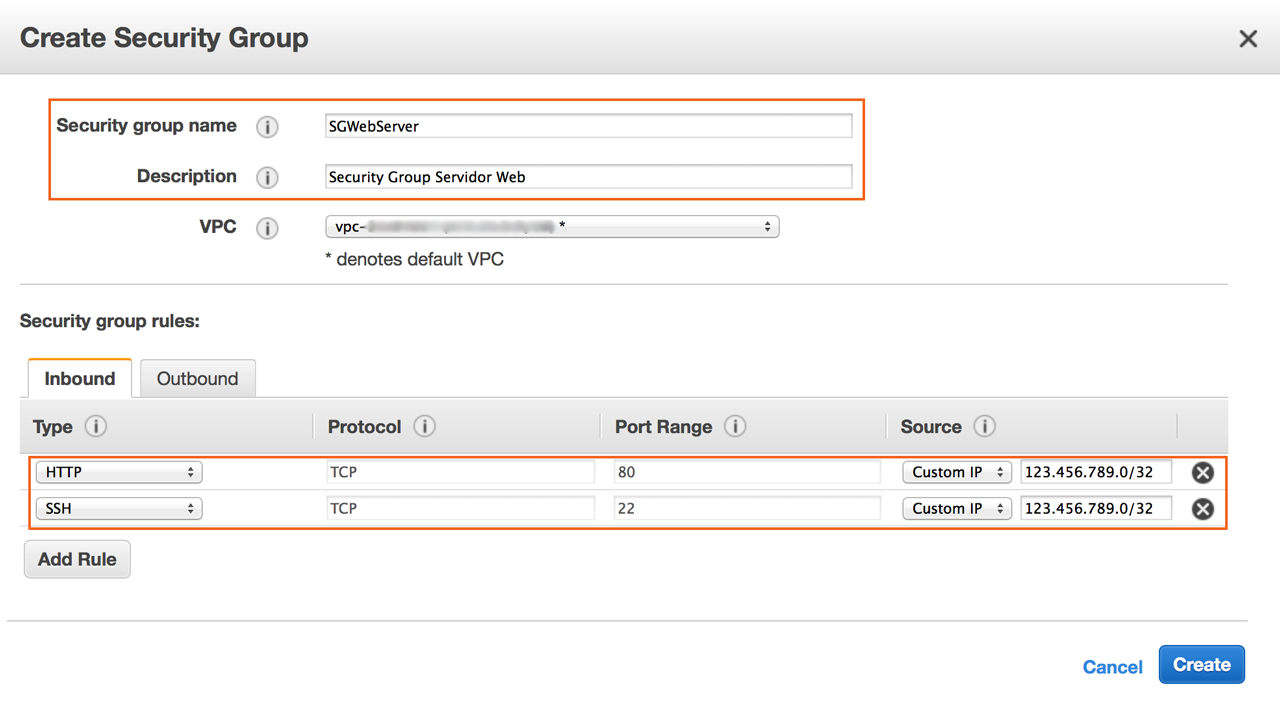 image 4.1: Configure Security Group
In this window, in the Inbound tab correctly fill in the most important fields:
- Security group name: Name this Security Group.
- Description : Enter a description to identify this Security Group.
Now, add the firewall rules by clicking the Add Rule
button in the column Type select the TCP protocol HTTP and then the same process also add the protocol for SSH.
IMPORTANT: As this instance will still go through several configurations and tests to become a publicly accessible webserver, then it is recommended to temporarily release accesses only for your IP, in the Source olumn inform your IP address, as you can see in the image 4.1.
To finish click Create.
Create an EC2 instance
Well, now in the side menu of the image 5.1 console click on Instances and then click on the Launch Instance.
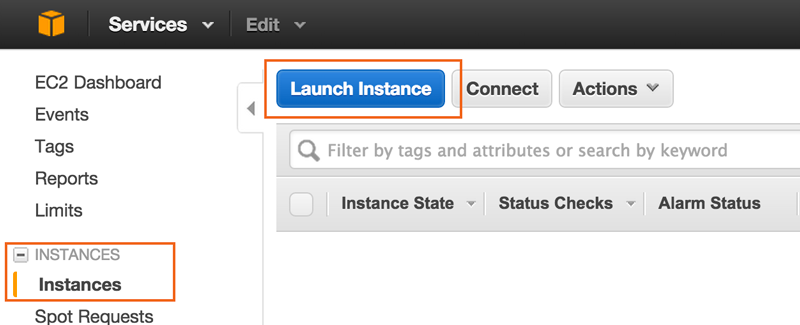 imagem 5.1: Create an EC2 Instance
A window with seven steps will open until the installation is complete, in step one select an image (AMI) you want to install, you can create an instance using Linux and Windows Server distributions. For this article, a Linux Ubuntu 14.10 distribution will be used and the type of virtualization will be HVM..
Step 1: Choose an Amazon Machine Image (AMI)
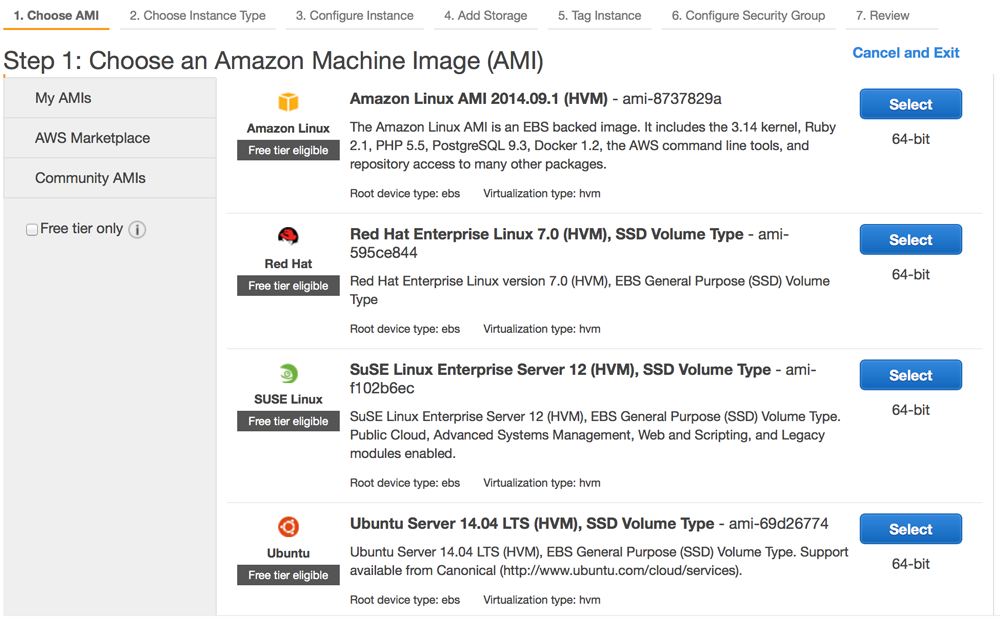 image 5.1: Choose an image (AMI)
Important: In the new generation of AWS instances, choose the type of virtualization HVM for better performance.
To proceed click Next.
Step 2: Choose an Instance Type
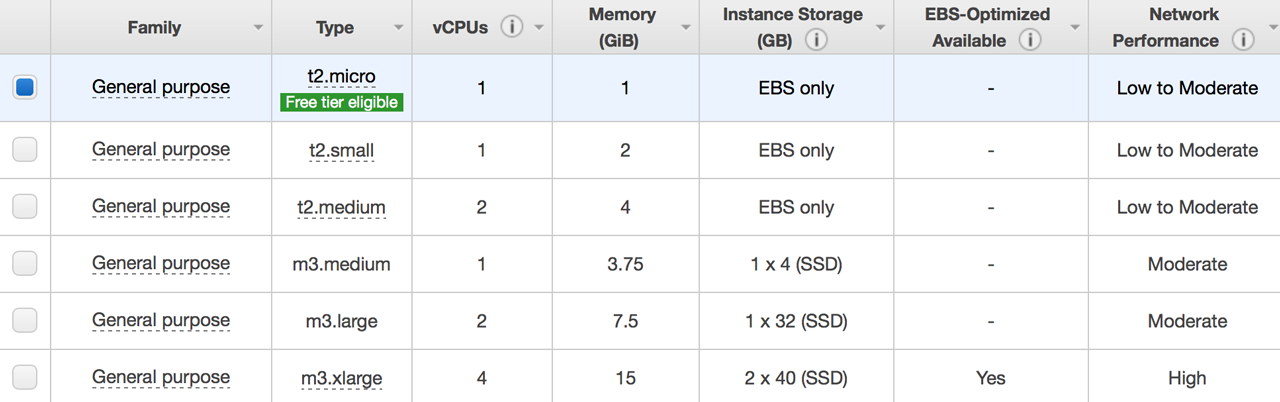 image 5.2: Choose a type of instant
In this screen image 5.2 echoose the type of hardware for your instance according to your needs. if Free Tier User is eligible you can choose to t2.micro.
Then click Next.
Step 3: Configure Instance Details
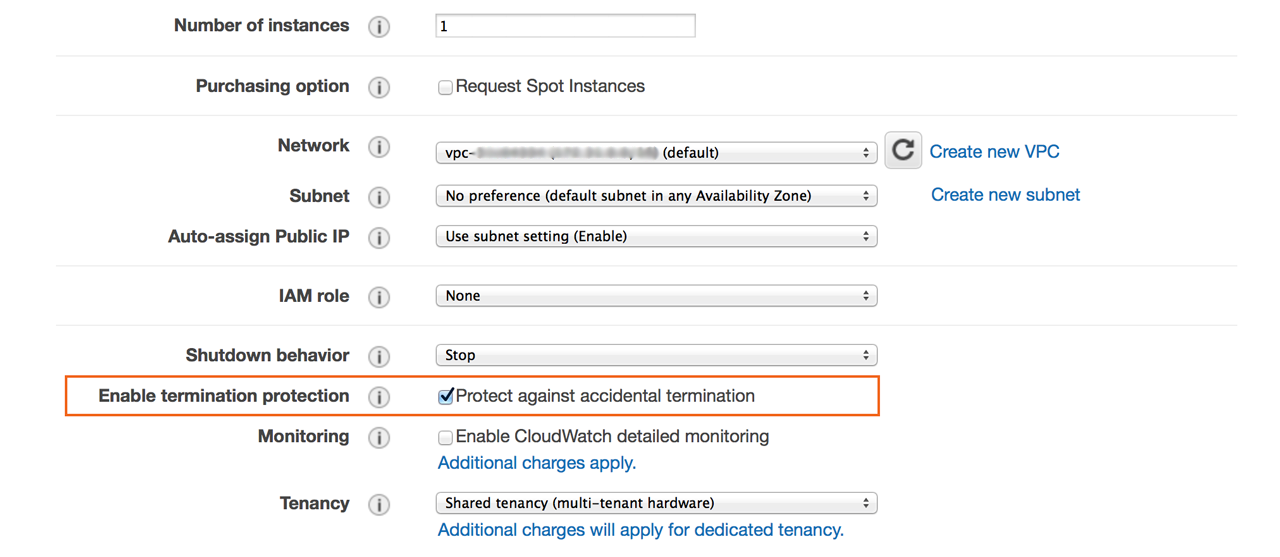 image 5.3: Configure Instance Details
In this screen image 5.3 just check the option Enable termination protection to prevent you from accidentally deleting this instance. Then click Next.
Step 4: Add Storage
 image 5.4: Configure Storage Amount
In the screen image 5.4 define the amount of storage in the Size (GiB) column , for best performance choose the type of storage SSD or Provisioned IOPS (SSD).
Click Next to continue.
Step 5: Tag Instance
 image 5.5: Create Instance Tags
This screen image 5.5 is optional, if necessary add tags to identify your instance, then click Next.
Step 6: Configure Security Group
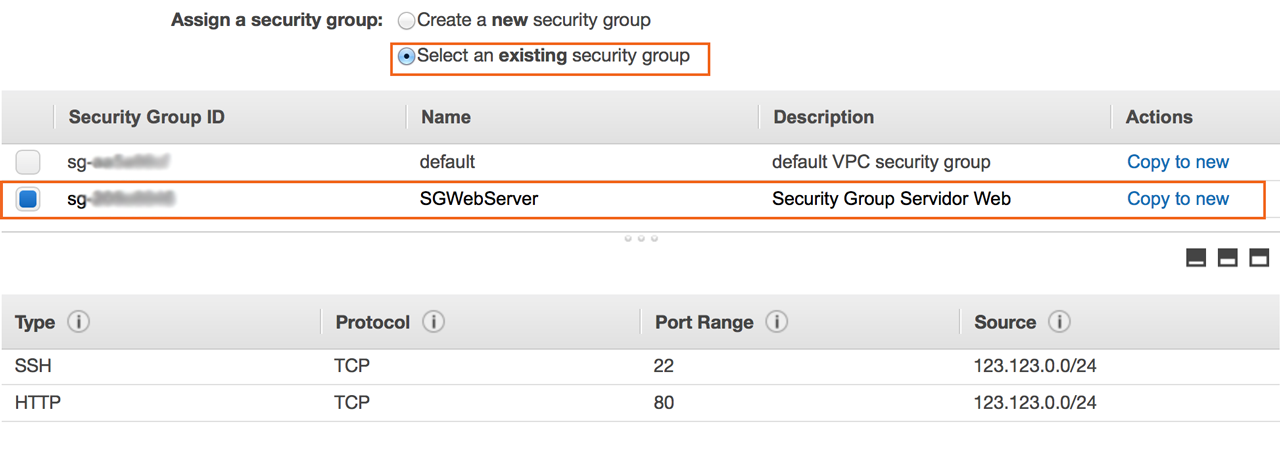 imagem 5.6: Configure Security Group
In this step, image 5.6 in the item Assign a security group check the option Select an existing security group and choose the Security Group that you created earlier, to finish click on Review and Launch.
Step 7: Review Instance Launch
- Review your settings then click Launch.
- AAfter clicking on Launch a dialog window will open image 5.7 , so that you have access to your instance via SSH in this window create your key pair or select an existing one.
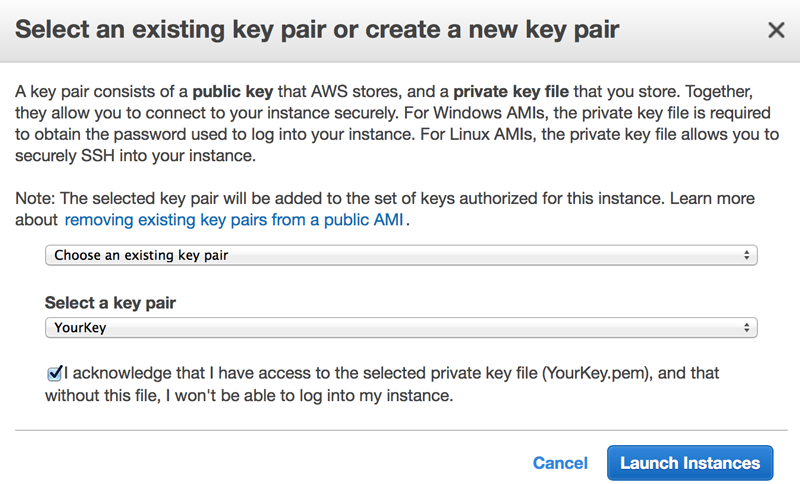 image 5.7: Select Key Pair or create one.
If you select the option: you will have to give a name to this key pair image 5.7.1 , and then click the Download Key Pair, button , save this file on your computer and later change the permissions of that file to only reading.
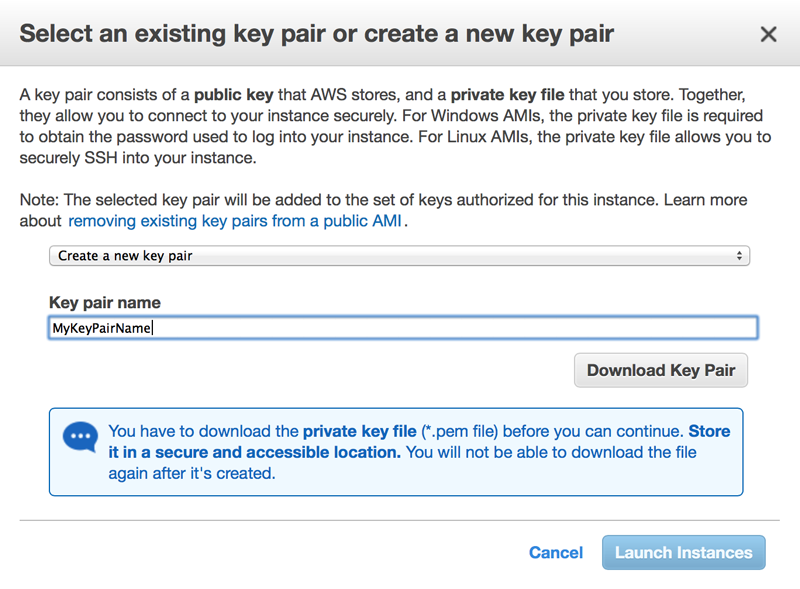 image 5.7.1: Create Key Pair
ATTENTION: The private key will be used for you to connect to the instance via SSH. Without this key you will not be able to access the instance at all.
Click the Launch Instance button and Done your instance will be created..
After that, go back to the EC2 Instances console and see in the description of this instance all the necessary information you need to connect via SSH, you can use the data from your Public IP or Public DNS.
So far so good, but the only problem is that when it is created it receives a Public IP and a Public DNS ex: ec2-XX-XX-XX-XX.ap-south-1.compute.amazonaws.com Where X is your Public IP, you can use both to connect or access your website, but every time you restart your instance this IP address and DNS change, so to resolve this issue it is important to associate a fixed IP to your instance using Elastic IP even because if you want to maintain a webserver you will have to have a fixed IP anyway..
Step 3 ends here, the next step is to create and associate an Elastic IP to that instance.
Create Elastic IP and associate it with an instance
In the side menu of the EC2 console go to NETWORK & SECURITY and click on Elastic IP, then click on Allocate New Address, click on Yes, Allocate.
After clicking yes Yes one the new Elastic IP swill be allocated, now it is necessary to associate this IP to your instance, then on that same screen select the newly allocated IP address and click on Associate Address, this will open a new dialog window image 6.2.
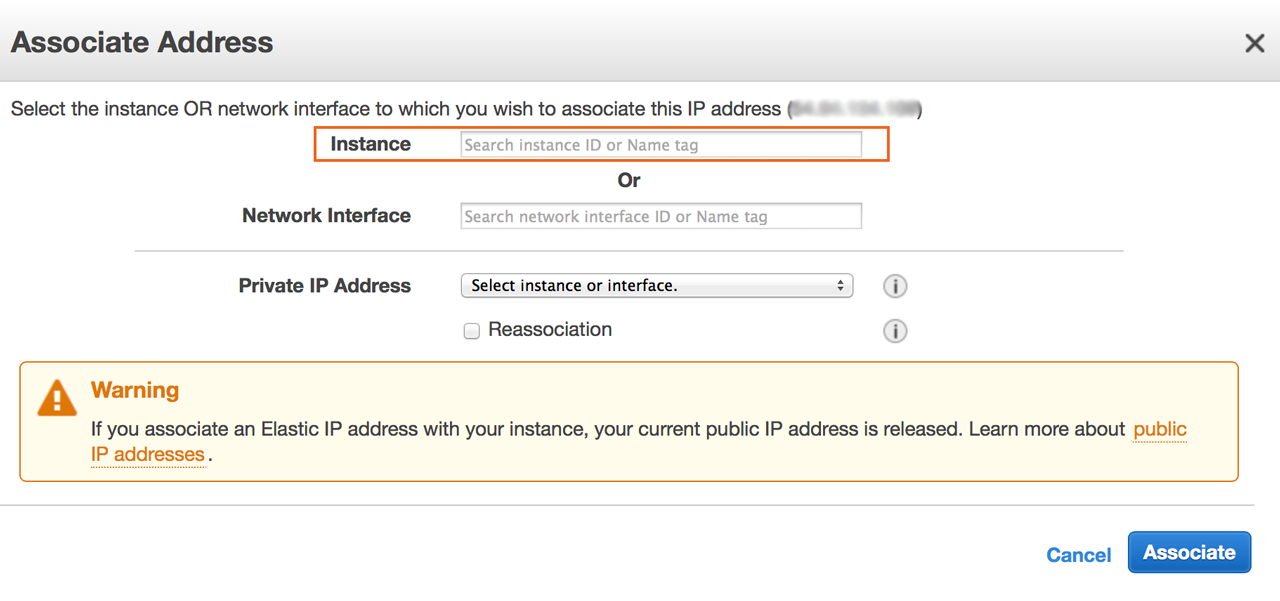 image 6.2
Just click on the Instance field and the console will intelligently display a list of your instances, select the instance on which you want to allocate this Elastic IP. To finish click on Associate.
Now back to the EC2 Instances console, see in the description of your Linux instance a public fixed IP has been defined. Now you can use this address whenever you connect to your instance.
Connect to Instance via SSH
Your Linux instance was created, an Elastic IP was associated! It is now possible to connect the instance securely via SSH, using your private key saved when creating the instance.
On Windows you must use the Putty program to access your server via SSH see here how to connect.
On UNIX systems, just open the terminal and first change the permission of your private key:
chmod 400 MyKeyPair.pem
Then you can connect the instance using the private key MyKeyPair.pem
SSH command to connect the instance remotely
$ ssh -i MyKeyPair.pem ubuntu@XX.XXX.XXX.XX
Tip: you can also connect using your DNS address ex:
$ ssh -i MyKeyPair.pem ubuntu@ec2-XX-XX-XXX-XXX.ap-south-1.compute.amazonaws.com
Tip: the default user on Linux Ubuntu is: ubuntu other Linux distributions can be ec2-user or root, but the process for connecting is the same.
If everything was done correctly the following Ubuntu welcome screen will be displayed:
Now having remote access to the instance it is possible to proceed with the other necessary configurations for a web server, these next steps will be detailed in next upcoming articles:
- How to setup linux Ubunut server
- How to configure a Linux Ubuntu Web server with PHP5, Apache and MySQL (LAMP).
- How to configure a Linux Web server with PHP5, Nginx and MySQL.
More tips can be found in this article:
Conclusion
We saw how to create a server in the AWS cloud, but what we call Instance, in a few clicks we have a web server up and running in one of the largest Cloud Computing companies, this is a simple installation, but there are several services and possibilities, depending on your type of business or project.